Our main anchor is a 33kg Rocna which we keep on our bow roller. This is somewhat larger that the anchor that it replaced and it took us a while to come up with a good method the stow it.
Temporary System for our First Full Season
We upgraded to the Rocna during the boat’s 2009/10 refit. When we received the anchor it was clear that it didn’t line up with the anchor retaining pin in our stemhead fitting. I didnt want to drill a new hole in the anchor shank because of possible future problems with corrosion (there would be no galvanized surface inside the hole) and in any case Rocan specifically advise against doing this.
We received the anchor shortly before setting off on a 4 month cruise so we needed a quick temporary solution to secure it. I made up a couple of wooden chocks to wedge between the anchor shank and the sides of the bow roller fitting, these were intended to stop the anchor moving from side to side on the bow roller. The anchor was then secured with lashings, one through the hole in its crown and through the anchor pin fixing holes in the stemhead fitting, and one through the end of the shank to the toe rail on either side. A short trip from Burnham on Crouch to Harwich into a typical Thames Estuary lumpy chop showed that this needed further work, the chocks worked loose and the anchor started to move about as we took waves over the bow.
I added fixing eyes to the chocks and took to running a lashing through these then around the stemhead fitting several times to lash the chocks down securely. This arrangement survived the rest of the season.
Although we now had secure stowage it took some time to unlash everything before deploying the anchor (though in an emergency we’ve have been able to cut it all free in a hurry) and even longer to secure the anchor on leaving an anchorage. We needed a simpler system so over the winter of 2010/11 we had some modifications made to the stemhead to improve things.
Stemhead Modification
Taking inspiration from some of the stowage suggestions on the Rocna website we had some modifications made to our stemhead . The final arrangement was a combination of my original idea and some thoughts that the stainless steel fabricators had.
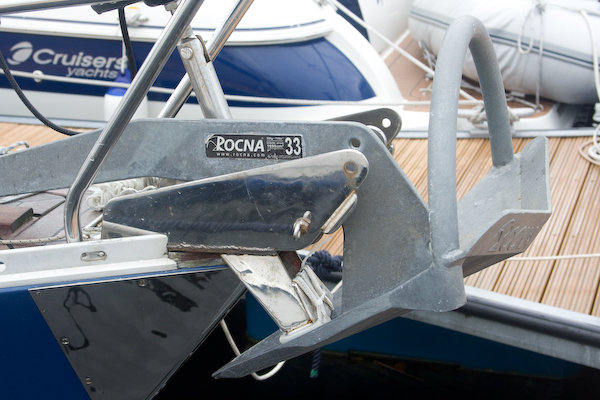
A short strut extends down and forwards from the bottom of the stemhead . This supports a plate that is shaped to match the inside surface of the Rocna’s blade. When the anchor is winched up onto the bow roller the plate matches up to the anchor’s blade so that pulling the anchor chain aft pulls the anchor up against the plate. With an aft pull on the anchor chain the anchor is held securely against the plate and cannot move in any direction.
I expect that the largest force on the stowed anchor would be from a wave hitting it from underneath when we’re taking waves over the bow into a head sea. In this case the force is pushing the anchor up against the mounting plate, which is a substantial piece of stainless steel, so it should stay exactly where it is. I think that this is a lot more secure than relying on a relatively thin retaining pin to take the load.
| |
| Anchor in position against the mounting plate |
| |
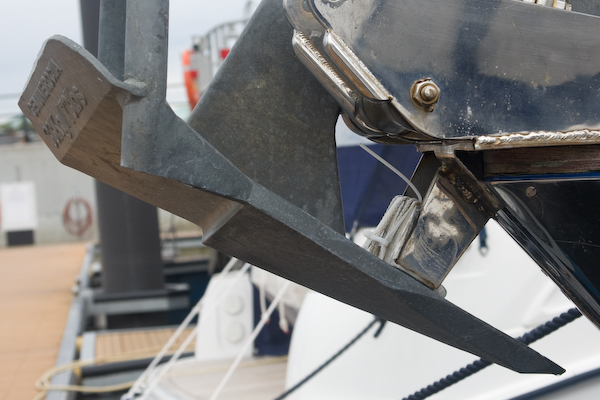
| Side view of the stowed anchor |
| |
|
Looking down on the stowed anchor. The plastic tubing buffer is visible between the anchor and the mounting plate. |

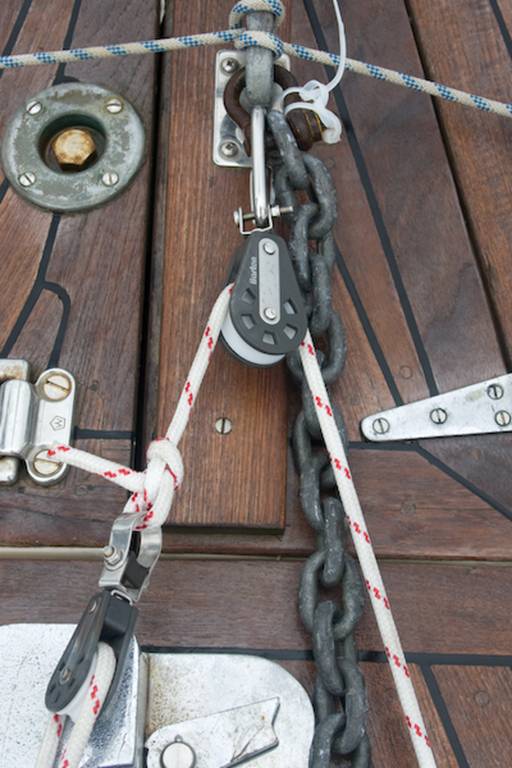
The stowage relies on a rearwards pull on the anchor to keep it in place. We use a block and tackle for this. A block hooks onto the shackle that attaches the chain to the anchor, a cascaded block doubles up the purchase and the two ends of rope are made off to strong points on the deck. This system allows us to apply sufficient pull to secure the anchor while leaving the windlass unloaded, so we’re not relying on the windlass to keep the anchor in place. If we’re setting off on a long passage or expect rough conditions we add a second lashing out to the toe rails for security.
We found that with direct metal to metal contact between the anchor and the mounting plate there was very little give in the system so it was difficult to tie the tackle off tight. To fix this we’ve added a little padding using a few sections of reinforced plastic pipe tie-wrapped to the mounting plate to act as a buffer. This provides just enough give to get the tackle nice and tight.
The other addition to the set up is a small stainless steel plate on the anchor locker lid that the top of the anchor shank sits on when it is fully home. If we’d arrange for the mounting plate to be angled slightly more towards the horizontal the shank would have been clear of the deck when fully home and we wouldn’t have needed this.
| |
|
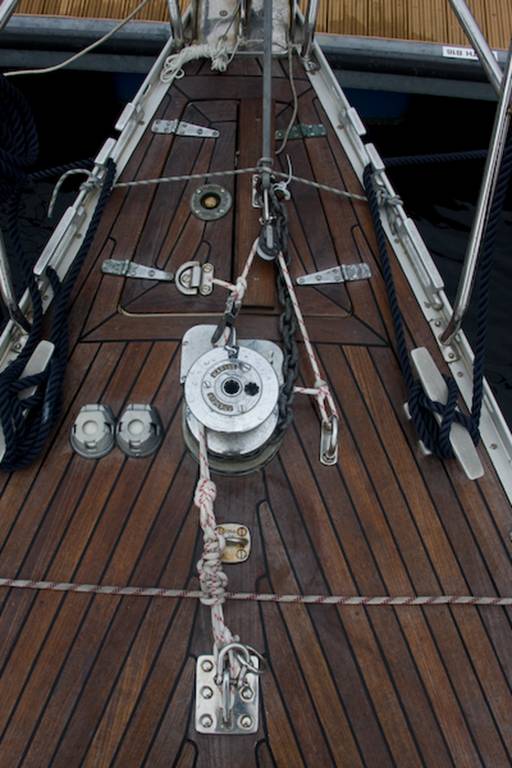
General deck view. The blue and while rope at the top of the picture is the extra security lashing. The main lashing runs from the D-ring next to the windlass, through a block at the anchor to a cascaded block that has its rope ends attached to the inner forestay fitting at the bottom of the picture. The red and white rope running across the deck is nothing to do with the anchor stowage (it’s our permanently rigged boom gybe preventer). |
| |
| Close up of the main lashing hooked on to the chain shackle. |
Practical Experience
The new system worked well during our cruise through the Orkney and Shetland islands. Preparing for anchoring is just a case of untying the lashing (or lashings) and un-hooking the system from the chain shackle. All of this is done on deck (if we had a traditional retaining pin then it would be necessary to lean out over the bow to unfasten it).
Stowing the anchor is now quick and easy. With the anchor winched most of the way home the purchase system is hooked on to the chain shackle, pulled tight and tied off, all without having to lean out over the pulpit.
An unexpected bonus of this set up is that the mounting plate keeps the tip of the anchor away from bow when we’re launching and retrieving it. Speedwell had picked up a few gelcoat scratches from the anchor so we had stainless steel plates fitted to protect the bow at the same time that we had the stemhead modifications. The new stainless steel plates are perfectly clean because the tip of the anchor is now kept clear by the mounting plate.
Our current set up isn’t the prettiest arrangement, but it is simple, practical and robust which are all good attributes for any system on a cruising boat.